Student Satisfaction Survey Template
A student satisfaction survey is a questionnaire that helps colleges and universities measure how students experience teaching quality, campus life, and support services — and turn that feedback into actionable improvements.
This AidaForm template follows higher-education feedback best practices and is built for clear, structured, actionable responses:
- Multi-page layout with a progress bar keeps completion rates high and the process professional
- Satisfaction rating + NPS scale deliver reliable metrics you can track from semester to semester
- Evaluation matrices cover academic programs, teaching quality, and campus services efficiently
- Optional open-ended questions capture student input in their own words without increasing survey fatigue
Click Use This Template to add it to your AidaForm account. Customize questions, logic, and design to match your institution — then share via direct link or embed directly on your university website.
Below on this page: question examples how to customize & launch the template practical tips related templates
AidaForm features for schools, colleges, and universities
Unlimited forms and fields for free
Create as many online forms as you need and add unlimited fields to collect the information your institution requires.
30% educational discount
Schools and colleges can save 30% on any paid AidaForm plan. Contact our support team to request a discount coupon.
Data privacy and secure collection
Collect feedback responsibly with secure form hosting and access controls. Add privacy notes to reassure students and help support compliance needs.
Anonymous feedback
Student responses remain anonymous unless you intentionally add contact fields. This helps encourage honest feedback and higher response quality.
Publish on your own domain
Embed the survey on your university website or publish it on your own domain for a familiar, trusted experience.
Exports and integrations
Export responses to Excel, Google Sheets, or PDF, or connect AidaForm to tools via Zapier for automated workflows.
What is a student satisfaction survey
A student satisfaction survey is a structured questionnaire used by schools, colleges, and universities to measure how students experience teaching quality, course content, campus services, and overall academic life. It helps institutions spot gaps early, track satisfaction over time, and make improvements that support retention and student success.
Use cases
Student satisfaction surveys are used across different stages and levels of education:
- end-of-semester or end-of-year reviews
- mid-semester pulse checks
- first-year student experience surveys
- graduate and postgraduate feedback
- online and remote learning evaluations
What to include in a student satisfaction survey
A well-designed survey combines structured scoring with room for honest, open input:
- a satisfaction rating or NPS scale
- matrix questions to evaluate multiple aspects at once (teaching, facilities, support)
- one or two open-ended comment fields
- clear sections grouped by topic, with a progress bar for longer surveys
Most effective surveys contain 10–20 questions — short enough to complete on a phone, long enough to cover the key areas. Shorter pulse surveys (5–7 questions) work well for quick, frequent check-ins. See question examples below for inspiration.
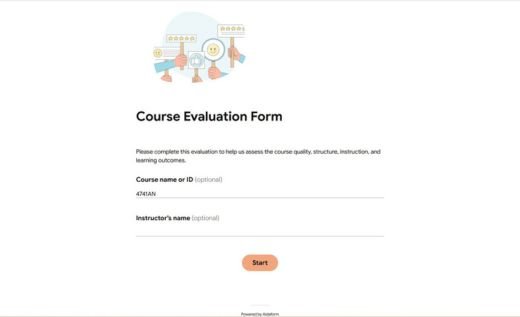
Student satisfaction survey vs. course evaluation
A course evaluation focuses narrowly on a single course — its content, structure, and the instructor’s teaching.
A student satisfaction survey takes a broader view, covering the overall experience across academics, campus life, and support services.
Many institutions run both: course evaluations each semester, and a broader satisfaction survey once or twice a year.
Student satisfaction survey question examples
While the survey template above already covers the core areas of student experience, you may want to adjust it to better reflect your institution’s specific goals. Below you’ll find additional student satisfaction survey questions you can copy, adapt, and add to your survey as needed.
Overall experience
- Overall, how satisfied are you with your experience at the university?
(5-point scale) - How likely are you to recommend this university to a friend or classmate?
(0-10 scale) - If you could choose again, would you enroll here?
(Yes / No) - What one change would most improve the student experience?
(Short comment, open-ended)
Academic program
To explore how students perceive the structure and value of their studies in more depth, you can organize the following statements into an agreement matrix. This format works well when you want to measure perceptions rather than overall satisfaction.
Recommended format: 5-point agreement scale
Strongly disagree / Disagree / Neutral / Agree / Strongly agree
Question:
Please indicate your level of agreement with the following statements.
Statements to include in the matrix:
- My program prepares me for my future career or further study.
- Course goals are clearly explained.
- The academic challenge level is appropriate.
- I have opportunities to apply what I learn in practice.
- Course materials are easy to access.
Teaching & assessment
To evaluate classroom experience and assessment practices in a concise way, you can group the following statements into an agreement matrix. This format keeps the survey compact while still covering the most important areas of instructional quality.
Recommended format: 5-point agreement scale
Strongly disagree / Disagree / Neutral / Agree / Strongly agree
Question:
Please indicate your level of agreement with the following statements.
Statements to include in the matrix:
- Instructors explain concepts clearly.
- Instructors are knowledgeable in their subject areas.
- Classes encourage participation and discussion.
- Grading criteria are clearly communicated.
- Assessments reflect what was taught in class.
- Feedback helps me improve my performance.
Campus environment & student life
To explore the broader student experience beyond academics, organize the following into a satisfaction matrix.
Recommended format: 5-point satisfaction scale
Very dissatisfied / Dissatisfied / Neutral / Satisfied / Very satisfied
Question:
How satisfied are you with the following aspects of campus life?
Aspects to include in the matrix:
- Campus safety
- Student activities and events
- Learning facilities
- Access to campus information
Student support & administration
To evaluate how well the institution supports students outside the classroom, you can combine support services and administrative processes into one satisfaction matrix.
Recommended format: 5-point satisfaction scale
Very dissatisfied / Dissatisfied / Neutral / Satisfied / Very satisfied (+ Not applicable)
Question:
How satisfied are you with the following services and processes?
Aspects to include in the matrix:
- Academic advising
- Career services
- Student wellbeing support
- Administrative services
- Timeliness of university communication
- Ease of administrative processes
- Support for international students
- Student housing services
How to customize and launch this survey template
Once you’ve reviewed the template, you can easily adjust this online student satisfaction survey to match your institution’s structure and branding before sharing it with students.
Add the template to your account
Click Use This Template to add the survey to your AidaForm account. If you’re already signed in, it will open in the editor immediately. New to AidaForm? Create a free account and the template will be ready on your dashboard.
Edit and expand the survey
Open the Builder to customize the questions. You can modify wording, remove sections, or add new fields from the Form Elements panel. Insert additional rating scales, Likert matrices, multiple-choice questions, dropdowns, or open-text fields to tailor the survey to your needs.
Apply your institution’s branding
In the Form Designer, adjust colors, fonts, and button styles to align the survey with your university’s visual identity. You can use preset themes or define your own brand colors for a consistent look.
Preview and publish
Use Preview to review the survey from a student’s perspective. When everything looks ready, open Publish and switch the form to Published. You can then share it via direct link or embed it on your university website.
Monitor responses and enable notifications
In Results, track submissions, view summaries, and analyze trends. You can also enable email notifications in Set Up to stay informed as new responses arrive.
Practical tips for running a student satisfaction survey
☑ Keep it anonymous
Anonymity leads to more honest responses. Let students know upfront that their answers won’t be linked to their identity.
☑ Time it carefully
Avoid exam periods, finals week, and holidays. End-of-semester timing works well for full surveys; short pulse surveys can run mid-semester without disrupting students.
☑ Keep it short and mobile-friendly
10-20 questions is the sweet spot for most surveys. If you need to go longer, use a progress bar and clear sections to keep students from dropping off.
☑ Promote the survey through multiple channels
Share the link by email, in class, and on your learning management system. A QR code on posters or handouts can also boost responses from students who prefer mobile.
☑ Close the feedback loop
Share a brief summary of results with students and show what’s changing as a result. This is one of the biggest drivers of response rates the next time you run the survey.
☑ Track the same core questions over time
Repeating key questions each semester or year lets you measure real progress, not just a one-time snapshot.